Monday, May 19, 2008

Seeds of May

Afghan Sunday was early this month to avoid Memorial Day (a.k.a. "Race Day" in Indiana). Most of the local knitters are behind (except for one who is well ahead of me), so I didn't feature any new blocks this month, but I'll go ahead and share a couple here anyway.

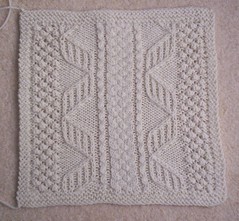
Isn't the seed stitch pretty on the Ann Strong square?
Ann Strong square
This is supposed to be one of the five easiest squares. I kept forgetting to purl through the back loop on the wrong side for the two columns of twisted stitches. I also made a lot of knit vs. purl mistakes on the wrong side rows because of the seed stitch, but they were easy to see and fix on the following row.

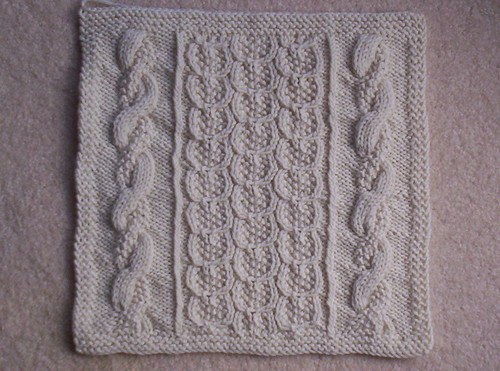
Fidgety business:To feed the consistency hobgoblin, I worked the upper and lower borders on 54 stitches like my other squares worked on #7 needles; I ended the border on a RS row and worked a WS foundation row (last row of each chart). The large side cables ended up due for a twist on the first row of the top border, so I worked some of the decreases as cable decreases. But if I were knitting this square a second time, I would center the side cables vertically instead by working the twists on rows 7 and 17 instead of 5 and 15. It doesn't keep me awake at night the way it is, so I left it. (You think I'm joking? Sadly, I have in fact had knitting-induced sleepless nights.)

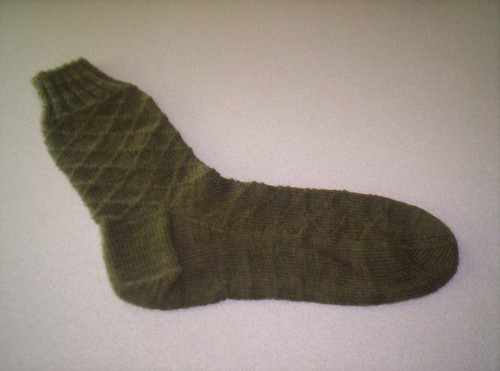
By the way, wrapping up the Sea of Despair socks (literally and figuratively; I gave them to my Mom for Mother's Day) sent me off on a sock-finishing bender. I knit a complete pair of DK-weight Opal stockinette men's socks in four days, finished a toe-up variation of CookieA's Mingus for myself (more on those later), and pulled a pair of diamond-brocaded socks based on a Nancy Bush pattern out of hibernation to finish for my husband:
Diamond Brocade
I promise there are two of them, but he was leaving for a business trip just as they finished drying after blocking, so I let him take them before I could get a photo of the pair. He finished teaching his spring semester classes and immediately skipped the country. Maybe he'll model the new socks when he gets back.

Thursday, May 08, 2008

A different type of stranded knitting

Here's the second square from April Afghan Sunday. It's the Hanna Burns square, a.k.a. "the DNA square."

Hanna Burns square

In the magazine photo of this square, the garter stitch borders clearly flare; and no wonder, since they are worked on 62 stitches with size 8 needles! I worked 48-stitch upper and lower borders, and the square is quite true. The central braid really draws in a lot, so I worked border increases/decreases about every other stitch in that section. Fidgety business: As usual for me, I ended the lower border with a RS increase row, then worked a WS foundation row; I also began the upper border with a RS decrease row, working decreases into cable crossings.

Some knitters find it confusing that the righthand "DNA strand" (Chart B) begins with Row 1 but the lefthand strand begins with Row 17. The tricky bit, for the spatially challenged, is to realize that when you are working on the wrong side, those positions are reversed. So for the second row of the patterned section, you have to work Row 18 of the chart for the first strand you come to, then work Row 2 for the second strand. Fidgety business: The only time this threw me was when I was working the WS foundation row; I should have worked Row 16 first and then Row 32, but I got them backwards on the first try and had to tink.

The square was a little narrow before blocking (11 1/4"), so I stopped a bit short in length also (11 1/2") to keep the proportions square, and it wet-blocked to 12" x 12" very nicely.

The consistency hobgoblin demands that I riff for a while on working all the 1/1 twists in such a manner that no individual stitches end up twisted. Here are my methods:

1/1 RT: This one is okay as written, but it's hard on my right wrist. I prefer to sl 2 tog kwise, then transfer both sts back to LH needle (this exchanges the positions of the 2 stitches and also changes their mount direction). K1 tbl twice.
1/1 LT: Sl 1 pwise, Sl 1 kwise, then transfer both sts back to LH needle (this changes the mount direction of the second stitch; otherwise it would get twisted by being worked through the back loop). Now with RH needle behind work, k 2nd st tbl, then k 1st st in front loop.
1/1 RPT: Also okay as written, but I like to sl 2 tog kwise, transfer both sts back to LH needle (as for the RT), K1 tbl, P1 tbl.
1/1 LPT: Reverse the mount of the second stitch as for a 1/1 LT. Now with RH needle behind work, p 2nd st tbl, then k 1st st in front loop. (BTW, it's much easier to dig out that purl stitch once it's been turned around, too.)

One last remark: Those strands aren't actually helixes. They don't spiral, they merely rotate one direction and then the other, because the twists in Row 13 and 29 go opposite directions. If you want them to truly spiral, replace the left twist in Row 29 with a right twist.

Monday, May 05, 2008

Out of the Sea

The Sea of Despair socks are done. (Yes, really done; the ends are actually woven in, not just tucked under for the purpose of photography. Not that I would do such a thing, ahem.)

Sea of Despair 1

The only interesting thing about this pair of socks (and its many, many friends) is the heel construction, which is my own. I've designed it to mimic, as accurately as possible, the traditional top-down flap-and-gusset round heel. When I say "as accurately as possible," we're talking viceroy vs. monarch here.

The foot circumference was 68 sts before beginning the gusset increases. I like mirrored left and right lifted increases for the gussets (the ones where you knit one leg of a stitch in the row below, not the "make 1"s where you knit the running thread between stitches); they look the most like decreases when viewed upside down. I work 12 gusset increase rounds every other round, increasing at each end of the sole stitches.

The bottom of the sole is a flap shaped exactly like the turning of a round heel. To get started, I mark the center 22 stitches of the sole and knit to the end of them, then turn and purl back to the beginning marker. Then I work in rows, working ssk at the end of each right-side row and p2tog at the end of each wrong-side row, until only 9 stitches remain after finishing a right-side row. I pick up and knit down the left side of the flap, one stitch per row (13 stitches), turn, sl1, purl to last 2 stitches, p2tog, pick up and purl 13 stitches down the other side of the flap. Now there are 34 stitches on the heel needles again, ready to turn.

The back of the sole is rectangular. It looks like a top-down heel flap, but it's executed with short rows, like turning a top-down square heel. Slipping the first stitch of every row, I just work back and forth on the 34 stitches on the heel needles, working the last stitch of the row together with one of the sole/gusset stitches with ssk or p2tog.

Now here's some really fidgety business, for complete sock construction junkies only. I don't have high insteps, so a stockinette heel back worked exactly like I just described would be too tall for me. The quick-and-dirty fix for this is to work sssk/p3tog every third pair of rows. I knit a lot of pairs of socks that way. However, gettting even more fidgety, this method also reduces the number of chain stitches down the sides of the heel back, producing a slightly "gathered" appearance which bothered me. So eventually, I figured out how to reduce the number of rows without reducing the number of chain stitches along the sides of the heel back. Every third right side row, after working the ssk, I put the last stitch made back onto the left hand needle and work another ssk. At the end of the next (wrong-side) row, I put the last stitch made back on the left needle and work another p2tog.

Got a headache now? Go knit something. I know I will.