Thursday, May 21, 2009

Technical difficulties and things that are pink

When I tried to photograph my latest stockinette sock, I ran into a problem. The pictures turned out fuzzy.

miranda helps

sock saddle

I promise I've got the second sock on needles already. Casting it on immediately isn't a surefire cure for second sock syndrome, but at least it keeps me from using the right set of needles in some other project, stalling out the second sock indefinitely. In fact, there is a solo sock on my coffee table right now as a result of the last time I failed to segue directly to the second sock; I robbed the needles for the purple ankle socks instead.

At least I've managed to cast on a non-stockinette sock. It's a charity project; I plan to donate the finished pair for the local Race for the Cure raffle in the fall.

sock for the cure 2

I'm using (by which I mean modifying) the Pink Ribbons: Breast Cancer Awareness Sock pattern by Lisa Lloyd, graciously distributed by her for free.

Tuesday, May 19, 2009

Two-pack

I've been in a stockinette sock slump again lately. This time I was carved into that rut so deeply that I made four matching socks. They're all knit from one 100-gram ball of sock yarn (Opal Cotton).

ankle socks 2-pack
How did I know I had enough yarn left to knit a second pair of socks? I used my kitchen scale. I've got a good digital one that will measure in grams or ounces. When I finished the first pair, I popped the rest of the ball on the scale; since it still weighed 54 grams, I knew I had enough for a second pair. By the way, I would have run out of yarn if I hadn't made them fraternal quadruplets (they're not quite identical, since the subtle stripe pattern falls differently on each sock).

A postal scale will also do nicely, and if you don't own a scale, all you have to do is stop by a post office with a self-serve scale in the lobby.

Wednesday, February 04, 2009

Six of Hearts

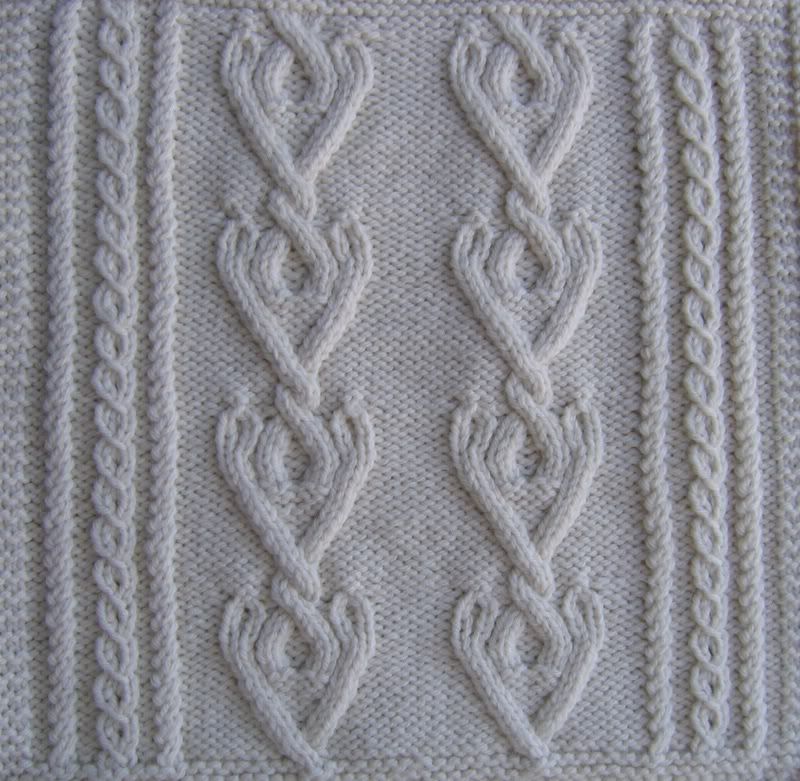
I've finally managed to resuscitate my Great American Aran Afghan. In honor of Valentine's Day, may I present the recently-completed Barbara Selesnick square:

Selesnick cropped

This is supposed to be one of the five easiest squares. Well, sure, if you knit exactly according to the pattern. But when I tried that, it was going to come out ridiculously short; if I added a fourth vertical repeat at that gauge, it would have been too tall.

I monkeyed around with several unsuccessful modifications, but in the end, I chose to add 4 rows of reverse stockinette to the center section before and after the heart motifs.

Fidgety business: I worked the garter borders on 51 stitches instead of 55. I increased four stitches in the last row of the border, then increased another four stitches in the process of beginning the first hearts (two stitches at the base of each motif, bringing the stitch count to the expected 59 and successfully avoiding cable splay.

By the way, here's Susan Rainey's interpretation of the Selesnick square with four pattern repeats.

Monday, December 01, 2008

Ravelry to the rescue

A couple of months ago, I had an unhappy surprise at Afghan Sunday. I laid my completed blocks out on the floor and stood back to look them over - and saw that the Carol Adams square, which had been in the shop window for a while, had faded! Martha (the shop owner) was quite apologetic and offered to replace the yarn; but even using her secret underground shopowner connections, she was unable to locate another ball of off-white Cascade 220 Superwash from the same dye lot.

Finally it occurred to me to post to the Ravelry group dedicated to the GAAA. After all, it has 450 members, and many of them are using the same yarn I am. And sure enough, within a few days, someone messaged me to report a sighting of the appropriate dye lot at her LYS! I phoned them right away and had them send me, not just one, but three balls. I should have enough yarn now to knit all 24 squares and the heavy cabled border if I want. Thanks very much, Heather (creativechick)! Also, thank you to the friendly, helpful staff of Knit-a-Bit in Westfield, NJ.

Now what am I going to do with that non-matching Carol Adams square?

Tuesday, November 04, 2008

What Your Pattern Never Told You

My mother is knitting garments! She's a multi-talented crafter who most recently has done miniature quilts and Native American-style beadwork. She's known how to knit (and crochet) for many years, and she let me teach her to knit socks after it became apparent that I couldn't produce them for her fast enough. But I haven't seen her make a sweater since I was a toddler (the red, white, and navy Fair Isle I wore to kindergarten is still around here somewhere, I think!).

Mom's sweater knitting has reminded me of just how much information about finishing isn't included in the average pattern. Many important decisions that affect the ease and appearance of seams and other details are made, not during the sewing-up process, but during the knitting of the pieces. Here are three suggestions for preparing the pieces of conventionally-constructed sweaters so that you won't dread the sewing and will be proud of the result.

Casting on: When you cast on for a piece that will later have a seam begin at its corner, leave a tail long enough to sew the seam. You'll have two fewer ends to weave in. How long a tail? For a mattress-stitched side seam, you need at least 1 1/2 times the length of the seam plus a tail to weave in. Err on the long side. To keep the long tail under control while you knit, wrap it around a bread tie (thanks to Lily Chin and the TV show Knitty Gritty for that hint!).

Edge stitches: If the side edges of the piece you're working on will end up in a seam, or have stitches picked up along them, keep the stitches nearest each edge (called selvedge stitches) as plain as possible. Ideally, keep the two stitches at each edge in stockinette or reverse stockinette. Work decreases one or two stitches in from the edge. If you work increases at the edges, place each new stitch two stitches in from the edge. This is easy for "make one" increases because they are worked between stitches; however, for Kf&b increases, remember that the bump which becomes the new stitch falls to the left of the stitch in which you increase. In order for the bump to occur two stitches from the edge, increase in the second stitch at the beginning of the row but the third stitch from the end. If you're really fussy (or just adventurous), use the mirror-image to Kf&b that I describe in this earlier post; since this increase produces a new stitch to the right of the stitch in which it's worked, work it in the second-to-last stitch.

New skeins: Begin a new skein only at the beginning of a row (unless you are splicing the ends together), so that you can weave the ends into a seam allowance later. Yes, this will waste a little yarn, but it's worth it. Be careful with the front pieces of cardigans which have knitted-in bands; join a new skein at a side edge, not a front edge.

This'll get you started. Some other time we'll have to talk about short row shoulder shaping.