Wednesday, February 04, 2009

Six of Hearts

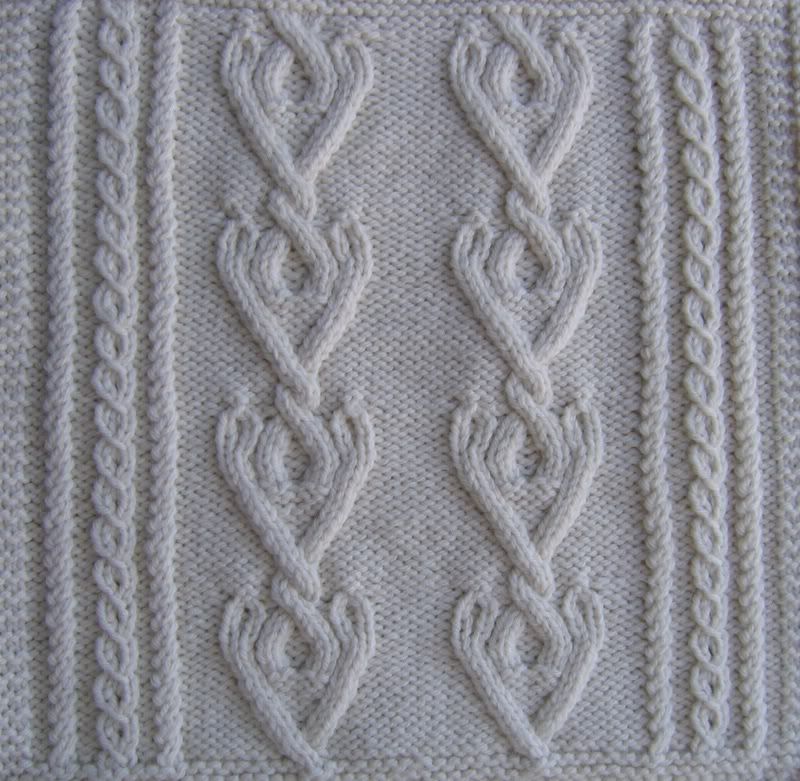
I've finally managed to resuscitate my Great American Aran Afghan. In honor of Valentine's Day, may I present the recently-completed Barbara Selesnick square:

Selesnick cropped

This is supposed to be one of the five easiest squares. Well, sure, if you knit exactly according to the pattern. But when I tried that, it was going to come out ridiculously short; if I added a fourth vertical repeat at that gauge, it would have been too tall.

I monkeyed around with several unsuccessful modifications, but in the end, I chose to add 4 rows of reverse stockinette to the center section before and after the heart motifs.

Fidgety business: I worked the garter borders on 51 stitches instead of 55. I increased four stitches in the last row of the border, then increased another four stitches in the process of beginning the first hearts (two stitches at the base of each motif, bringing the stitch count to the expected 59 and successfully avoiding cable splay.

By the way, here's Susan Rainey's interpretation of the Selesnick square with four pattern repeats.

Monday, December 01, 2008

Ravelry to the rescue

A couple of months ago, I had an unhappy surprise at Afghan Sunday. I laid my completed blocks out on the floor and stood back to look them over - and saw that the Carol Adams square, which had been in the shop window for a while, had faded! Martha (the shop owner) was quite apologetic and offered to replace the yarn; but even using her secret underground shopowner connections, she was unable to locate another ball of off-white Cascade 220 Superwash from the same dye lot.

Finally it occurred to me to post to the Ravelry group dedicated to the GAAA. After all, it has 450 members, and many of them are using the same yarn I am. And sure enough, within a few days, someone messaged me to report a sighting of the appropriate dye lot at her LYS! I phoned them right away and had them send me, not just one, but three balls. I should have enough yarn now to knit all 24 squares and the heavy cabled border if I want. Thanks very much, Heather (creativechick)! Also, thank you to the friendly, helpful staff of Knit-a-Bit in Westfield, NJ.

Now what am I going to do with that non-matching Carol Adams square?

Tuesday, November 04, 2008

What Your Pattern Never Told You

My mother is knitting garments! She's a multi-talented crafter who most recently has done miniature quilts and Native American-style beadwork. She's known how to knit (and crochet) for many years, and she let me teach her to knit socks after it became apparent that I couldn't produce them for her fast enough. But I haven't seen her make a sweater since I was a toddler (the red, white, and navy Fair Isle I wore to kindergarten is still around here somewhere, I think!).

Mom's sweater knitting has reminded me of just how much information about finishing isn't included in the average pattern. Many important decisions that affect the ease and appearance of seams and other details are made, not during the sewing-up process, but during the knitting of the pieces. Here are three suggestions for preparing the pieces of conventionally-constructed sweaters so that you won't dread the sewing and will be proud of the result.

Casting on: When you cast on for a piece that will later have a seam begin at its corner, leave a tail long enough to sew the seam. You'll have two fewer ends to weave in. How long a tail? For a mattress-stitched side seam, you need at least 1 1/2 times the length of the seam plus a tail to weave in. Err on the long side. To keep the long tail under control while you knit, wrap it around a bread tie (thanks to Lily Chin and the TV show Knitty Gritty for that hint!).

Edge stitches: If the side edges of the piece you're working on will end up in a seam, or have stitches picked up along them, keep the stitches nearest each edge (called selvedge stitches) as plain as possible. Ideally, keep the two stitches at each edge in stockinette or reverse stockinette. Work decreases one or two stitches in from the edge. If you work increases at the edges, place each new stitch two stitches in from the edge. This is easy for "make one" increases because they are worked between stitches; however, for Kf&b increases, remember that the bump which becomes the new stitch falls to the left of the stitch in which you increase. In order for the bump to occur two stitches from the edge, increase in the second stitch at the beginning of the row but the third stitch from the end. If you're really fussy (or just adventurous), use the mirror-image to Kf&b that I describe in this earlier post; since this increase produces a new stitch to the right of the stitch in which it's worked, work it in the second-to-last stitch.

New skeins: Begin a new skein only at the beginning of a row (unless you are splicing the ends together), so that you can weave the ends into a seam allowance later. Yes, this will waste a little yarn, but it's worth it. Be careful with the front pieces of cardigans which have knitted-in bands; join a new skein at a side edge, not a front edge.

This'll get you started. Some other time we'll have to talk about short row shoulder shaping.

Sunday, June 29, 2008

It slipped my mind

It's Afghan Sunday again and I've hardly touched the afghan in weeks, except to move the stack of finished squares around so the cat won't sleep on it. I did finish the Patt Tanton Hewitt square, which I was working on at the last meeting.

Hewitt square

I went down a needle size and this square still came out a smidge oversized (12-1/4”W x 12-1/2”H, after wet blocking). You can see it's a little taller than it is wide. It would have been even taller, except that I trimmed a few rows off. I ended the lower border with a RS inc row and then started the charts on Row 2 (instead of working a foundation row consisting of the last row of each chart, which would have meant two more rows). Correspondingly, I ended the patterned section with Row 2 of chart C, and incorporated the cables of Row 3 into the RS decrease row of the upper border.

Fidgety business: I found that the M1P’s distorted the reverse stockinette too much, so I replaced each with a backwards loop cast on in the previous row. And in Row 25 of Chart C, just to be consistent, I replaced the SSK and K2tog by P2togs by borrowing a purl stitch from each neighboring panel.

Here’s a hint I saw on Ravelry just after I finished: use two different-colored DPNs for the cable calisthenics. (By the way, Ravelry has a group devoted entirely to this project, and it's full of helpful and amusing people.) The tightness of the stitches while working those multi-strand cables made working this square physically tiring and hard on my wrists, but the high "ooh pretty" factor gives you a pretty high return on your investment.

I've almost finished the Salazar square, too. Here's a shot of the center section; I've got the borders done and sewn on now. Maybe I'll finally wrap up the chain stitching this afternoon.

Friday, June 06, 2008

Passing the bar

I've been deconstructing the humble bar increase lately. I'm talking about the one where you knit the front leg of a stitch without removing it from the left needle, then knit the back leg. The stitch you're working into gets a half twist, forming a little bump to the left.


In this earlier post I described how to work a less-prominent variation on the bar increase. Here's the structural difference between Kf&b and the variant: in the purple figure above, look closely at the twist. The horizontal-ish part lies on top. In the variant, the vertical-ish part ends up on top, as in the green figure. That's why the horizontal bump lies to the back of the fabric.

Once upon a time, I was working on a pair of gloves with bar increases for the thumb gusset, and it bothered me that the increases weren't symmetrical. Yes, I know that if you Choose Wisely which stitches to work Kf&b in, you can make the placement of the bumps symmetrical; but still, they aren't perfect mirror images because there's a bit of distortion to the right of each bump. What I wanted was an increase that is a structural mirror image of Kf&b, with the bump lying to the right, as in the blue figure. So I unvented one.

Here's how to work the blue increase: remount the stitch left leg nearside. Knit the front leg and remove the stitch from the right needle (so far, you've merely made a twisted knit stitch). With the tip of the left needle, pick up the strand that runs from lower left to upper right of the stitch just removed (it's the top strand of the twist), and knit the back of it.

It's also possible to work the mirror image of the variant (peach figure), but it's a little more awkward. Knit the back leg and remove the stitch from the right needle (a traditional twisted knit). With the tip of the left needle, pick up the back strand of the twist, and knit the front of it.

It took me about three days to draw those figures, and I'm all tuckered out, so I'll have to tell you about Pf&b and its friends another day.