Monday, December 01, 2008
Ravelry to the rescue
Finally it occurred to me to post to the Ravelry group dedicated to the GAAA. After all, it has 450 members, and many of them are using the same yarn I am. And sure enough, within a few days, someone messaged me to report a sighting of the appropriate dye lot at her LYS! I phoned them right away and had them send me, not just one, but three balls. I should have enough yarn now to knit all 24 squares and the heavy cabled border if I want. Thanks very much, Heather (creativechick)! Also, thank you to the friendly, helpful staff of Knit-a-Bit in Westfield, NJ.
Now what am I going to do with that non-matching Carol Adams square?
Tuesday, November 04, 2008
What Your Pattern Never Told You
Mom's sweater knitting has reminded me of just how much information about finishing isn't included in the average pattern. Many important decisions that affect the ease and appearance of seams and other details are made, not during the sewing-up process, but during the knitting of the pieces. Here are three suggestions for preparing the pieces of conventionally-constructed sweaters so that you won't dread the sewing and will be proud of the result.
Casting on: When you cast on for a piece that will later have a seam begin at its corner, leave a tail long enough to sew the seam. You'll have two fewer ends to weave in. How long a tail? For a mattress-stitched side seam, you need at least 1 1/2 times the length of the seam plus a tail to weave in. Err on the long side. To keep the long tail under control while you knit, wrap it around a bread tie (thanks to Lily Chin and the TV show Knitty Gritty for that hint!).
Edge stitches: If the side edges of the piece you're working on will end up in a seam, or have stitches picked up along them, keep the stitches nearest each edge (called selvedge stitches) as plain as possible. Ideally, keep the two stitches at each edge in stockinette or reverse stockinette. Work decreases one or two stitches in from the edge. If you work increases at the edges, place each new stitch two stitches in from the edge. This is easy for "make one" increases because they are worked between stitches; however, for Kf&b increases, remember that the bump which becomes the new stitch falls to the left of the stitch in which you increase. In order for the bump to occur two stitches from the edge, increase in the second stitch at the beginning of the row but the third stitch from the end. If you're really fussy (or just adventurous), use the mirror-image to Kf&b that I describe in this earlier post; since this increase produces a new stitch to the right of the stitch in which it's worked, work it in the second-to-last stitch.
New skeins: Begin a new skein only at the beginning of a row (unless you are splicing the ends together), so that you can weave the ends into a seam allowance later. Yes, this will waste a little yarn, but it's worth it. Be careful with the front pieces of cardigans which have knitted-in bands; join a new skein at a side edge, not a front edge.
This'll get you started. Some other time we'll have to talk about short row shoulder shaping.
Sunday, June 29, 2008
It slipped my mind
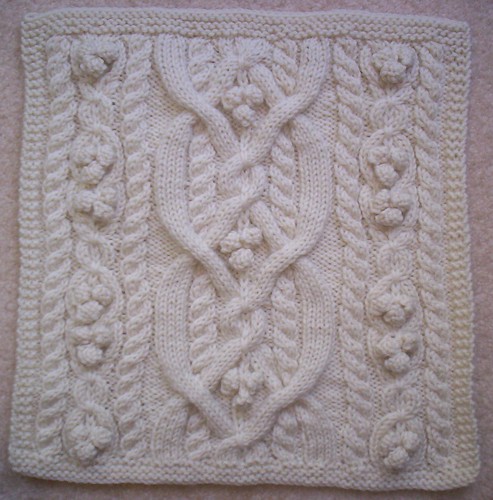
I went down a needle size and this square still came out a smidge oversized (12-1/4”W x 12-1/2”H, after wet blocking). You can see it's a little taller than it is wide. It would have been even taller, except that I trimmed a few rows off. I ended the lower border with a RS inc row and then started the charts on Row 2 (instead of working a foundation row consisting of the last row of each chart, which would have meant two more rows). Correspondingly, I ended the patterned section with Row 2 of chart C, and incorporated the cables of Row 3 into the RS decrease row of the upper border.
Fidgety business: I found that the M1P’s distorted the reverse stockinette too much, so I replaced each with a backwards loop cast on in the previous row. And in Row 25 of Chart C, just to be consistent, I replaced the SSK and K2tog by P2togs by borrowing a purl stitch from each neighboring panel.
Here’s a hint I saw on Ravelry just after I finished: use two different-colored DPNs for the cable calisthenics. (By the way, Ravelry has a group devoted entirely to this project, and it's full of helpful and amusing people.) The tightness of the stitches while working those multi-strand cables made working this square physically tiring and hard on my wrists, but the high "ooh pretty" factor gives you a pretty high return on your investment.
 I've almost finished the Salazar square, too. Here's a shot of the center section; I've got the borders done and sewn on now. Maybe I'll finally wrap up the chain stitching this afternoon.
Friday, June 06, 2008
Passing the bar
 I've been deconstructing the humble bar increase lately. I'm talking about the one where you knit the front leg of a stitch without removing it from the left needle, then knit the back leg. The stitch you're working into gets a half twist, forming a little bump to the left.
 In this earlier post I described how to work a less-prominent variation on the bar increase. Here's the structural difference between Kf&b and the variant: in the purple figure above, look closely at the twist. The horizontal-ish part lies on top. In the variant, the vertical-ish part ends up on top, as in the green figure. That's why the horizontal bump lies to the back of the fabric.
 Once upon a time, I was working on a pair of gloves with bar increases for the thumb gusset, and it bothered me that the increases weren't symmetrical. Yes, I know that if you Choose Wisely which stitches to work Kf&b in, you can make the placement of the bumps symmetrical; but still, they aren't perfect mirror images because there's a bit of distortion to the right of each bump. What I wanted was an increase that is a structural mirror image of Kf&b, with the bump lying to the right, as in the blue figure. So I unvented one.
Here's how to work the blue increase: remount the stitch left leg nearside. Knit the front leg and remove the stitch from the right needle (so far, you've merely made a twisted knit stitch). With the tip of the left needle, pick up the strand that runs from lower left to upper right of the stitch just removed (it's the top strand of the twist), and knit the back of it.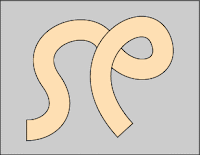 It's also possible to work the mirror image of the variant (peach figure), but it's a little more awkward. Knit the back leg and remove the stitch from the right needle (a traditional twisted knit). With the tip of the left needle, pick up the back strand of the twist, and knit the front of it.
It took me about three days to draw those figures, and I'm all tuckered out, so I'll have to tell you about Pf&b and its friends another day.
Monday, May 19, 2008
Seeds of May
Isn't the seed stitch pretty on the Ann Strong square?
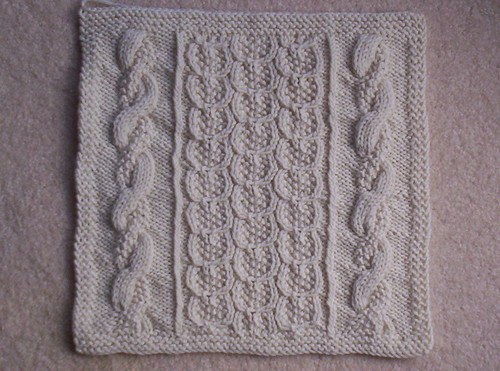
This is supposed to be one of the five easiest squares. I kept forgetting to purl through the back loop on the wrong side for the two columns of twisted stitches. I also made a lot of knit vs. purl mistakes on the wrong side rows because of the seed stitch, but they were easy to see and fix on the following row.
Fidgety business:To feed the consistency hobgoblin, I worked the upper and lower borders on 54 stitches like my other squares worked on #7 needles; I ended the border on a RS row and worked a WS foundation row (last row of each chart). The large side cables ended up due for a twist on the first row of the top border, so I worked some of the decreases as cable decreases. But if I were knitting this square a second time, I would center the side cables vertically instead by working the twists on rows 7 and 17 instead of 5 and 15. It doesn't keep me awake at night the way it is, so I left it. (You think I'm joking? Sadly, I have in fact had knitting-induced sleepless nights.)
By the way, wrapping up the Sea of Despair socks (literally and figuratively; I gave them to my Mom for Mother's Day) sent me off on a sock-finishing bender. I knit a complete pair of DK-weight Opal stockinette men's socks in four days, finished a toe-up variation of CookieA's Mingus for myself (more on those later), and pulled a pair of diamond-brocaded socks based on a Nancy Bush pattern out of hibernation to finish for my husband:
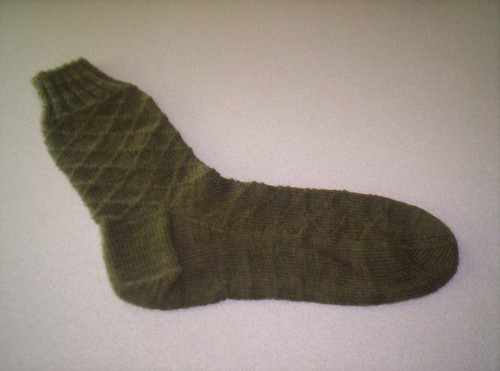
I promise there are two of them, but he was leaving for a business trip just as they finished drying after blocking, so I let him take them before I could get a photo of the pair. He finished teaching his spring semester classes and immediately skipped the country. Maybe he'll model the new socks when he gets back.
Thursday, May 08, 2008
A different type of stranded knitting
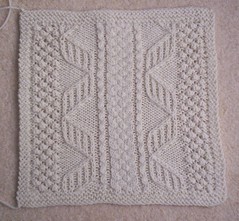
In the magazine photo of this square, the garter stitch borders clearly flare; and no wonder, since they are worked on 62 stitches with size 8 needles! I worked 48-stitch upper and lower borders, and the square is quite true. The central braid really draws in a lot, so I worked border increases/decreases about every other stitch in that section. Fidgety business: As usual for me, I ended the lower border with a RS increase row, then worked a WS foundation row; I also began the upper border with a RS decrease row, working decreases into cable crossings.
Some knitters find it confusing that the righthand "DNA strand" (Chart B) begins with Row 1 but the lefthand strand begins with Row 17. The tricky bit, for the spatially challenged, is to realize that when you are working on the wrong side, those positions are reversed. So for the second row of the patterned section, you have to work Row 18 of the chart for the first strand you come to, then work Row 2 for the second strand. Fidgety business: The only time this threw me was when I was working the WS foundation row; I should have worked Row 16 first and then Row 32, but I got them backwards on the first try and had to tink.
The square was a little narrow before blocking (11 1/4"), so I stopped a bit short in length also (11 1/2") to keep the proportions square, and it wet-blocked to 12" x 12" very nicely.
The consistency hobgoblin demands that I riff for a while on working all the 1/1 twists in such a manner that no individual stitches end up twisted. Here are my methods:
1/1 RT: This one is okay as written, but it's hard on my right wrist. I prefer to sl 2 tog kwise, then transfer both sts back to LH needle (this exchanges the positions of the 2 stitches and also changes their mount direction). K1 tbl twice.
1/1 LT: Sl 1 pwise, Sl 1 kwise, then transfer both sts back to LH needle (this changes the mount direction of the second stitch; otherwise it would get twisted by being worked through the back loop). Now with RH needle behind work, k 2nd st tbl, then k 1st st in front loop.
1/1 RPT: Also okay as written, but I like to sl 2 tog kwise, transfer both sts back to LH needle (as for the RT), K1 tbl, P1 tbl.
1/1 LPT: Reverse the mount of the second stitch as for a 1/1 LT. Now with RH needle behind work, p 2nd st tbl, then k 1st st in front loop. (BTW, it's much easier to dig out that purl stitch once it's been turned around, too.)
One last remark: Those strands aren't actually helixes. They don't spiral, they merely rotate one direction and then the other, because the twists in Row 13 and 29 go opposite directions. If you want them to truly spiral, replace the left twist in Row 29 with a right twist.
Monday, May 05, 2008
Out of the Sea

The only interesting thing about this pair of socks (and its many, many friends) is the heel construction, which is my own. I've designed it to mimic, as accurately as possible, the traditional top-down flap-and-gusset round heel. When I say "as accurately as possible," we're talking viceroy vs. monarch here.
The foot circumference was 68 sts before beginning the gusset increases. I like mirrored left and right lifted increases for the gussets (the ones where you knit one leg of a stitch in the row below, not the "make 1"s where you knit the running thread between stitches); they look the most like decreases when viewed upside down. I work 12 gusset increase rounds every other round, increasing at each end of the sole stitches.
The bottom of the sole is a flap shaped exactly like the turning of a round heel. To get started, I mark the center 22 stitches of the sole and knit to the end of them, then turn and purl back to the beginning marker. Then I work in rows, working ssk at the end of each right-side row and p2tog at the end of each wrong-side row, until only 9 stitches remain after finishing a right-side row. I pick up and knit down the left side of the flap, one stitch per row (13 stitches), turn, sl1, purl to last 2 stitches, p2tog, pick up and purl 13 stitches down the other side of the flap. Now there are 34 stitches on the heel needles again, ready to turn.
The back of the sole is rectangular. It looks like a top-down heel flap, but it's executed with short rows, like turning a top-down square heel. Slipping the first stitch of every row, I just work back and forth on the 34 stitches on the heel needles, working the last stitch of the row together with one of the sole/gusset stitches with ssk or p2tog.
Now here's some really fidgety business, for complete sock construction junkies only. I don't have high insteps, so a stockinette heel back worked exactly like I just described would be too tall for me. The quick-and-dirty fix for this is to work sssk/p3tog every third pair of rows. I knit a lot of pairs of socks that way. However, gettting even more fidgety, this method also reduces the number of chain stitches down the sides of the heel back, producing a slightly "gathered" appearance which bothered me. So eventually, I figured out how to reduce the number of rows without reducing the number of chain stitches along the sides of the heel back. Every third right side row, after working the ssk, I put the last stitch made back onto the left hand needle and work another ssk. At the end of the next (wrong-side) row, I put the last stitch made back on the left needle and work another p2tog.
Got a headache now? Go knit something. I know I will.
Sunday, April 27, 2008
My afghan's getting bigger

Here's a nifty variation on the Kf&b increase that I've been using on these squares for the get-out-of-garter stitch increases. First, reverse the stitch mount (if necessary) so that the left leg is nearside. knit the back leg, then the front leg (Kb&f). What's the point? When worked on a RS row, it makes the little bump hunker down deeper into the fabric. Also, if you sneakily choose your increase points so that those new "bump stitches" become the bottom of purl stitch columns, they blend in with the scenery even more.
Thursday, April 17, 2008
Orts
As a result of all this stockinette, I got it in my head to try controlling the tension for purl rows with my thumb. I'm pretty infatuated, but I've got to swatch properly, and then I'll report.
I had to start a new sock project because I was going to a classical music concert and needed something on wooden needles (no clinking). So I cast on Cookie A's new Stricken socks, but I've ripped them out at least twice now. First I misread the chart; the second time, I decided I really needed to make the calf more shapely, since the biasing and the twisted stitches interfere with its stretch. And I only got a couple of inches into her Mingus socks before bailing on that too. I'm going to start over and convert this to toe-up so I can control the fit more easily.
There are a couple of bits of good knit-news: mercifully, whatever was ailing the gauge of the Sea of Despair Socks seems to have straightened itself out, so the second one has a heel now. And I got my own copy of Principles of Knitting! I swapped my spare copy of Alice Starmore's Stillwater for it. Hurray, Ravelry!
Oh, and I cast on Nancy Bush's Estonian Socks yesterday for No Good Reason At All.
Monday, March 31, 2008
Mad as a March square

I'm surprised that the Barbara McIntire square didn't make the "Five Easiest" list. I've found it to be the easiest square of the lot. Yeah, there are a lot of cable crossings, but there are no other techniques required: no moss or seed stitch, no bobbles, and certainly no calisthenics with multiple double pointed needles. All the wrong side rows are "rest rows": knit the knits, purl the purls. And the two major charts even have the same number of rows.
I did have to go down a size from the suggested #8 needles in order to keep the square from turning out too wide. And I added four rows to the beginning of the central Saxon braid so that it would turn out vertically centered, but you already knew I was funny that way.

The other featured square for March was the Ada Fenick square. Can you believe I actually knit something according to the directions for a change? It was a little challenging to keep my place when working the ground and sky sections, but none of the techniques were difficult. And I really like those monster-bobbles.
I read a great hint on Ravelry about knitting from charts: use colored highlighters or pencils to shade each cable, then shade the corresponding instructions in the written directions with the same color. I'm too lazy to actually do this (I'm frequently too lazy to place a stitch marker when I should, and usually pay for it), but it's a terrific idea.
Friday, March 28, 2008
A postlet from hell
These socks shall henceforth be known as the Sea of Despair Socks.
Wednesday, March 26, 2008
The wrath of the gods

Okay, I have definitely upset some minor knitting deity. I've been working on this cape from Sandi Rosner's book Not Just Socks for Kids and have five out of six sections finished. I had to start a second ball of yarn for the last section. And would you believe, on this ball the salmon pink is brighter than on the first ball? (Same lot.) It's subtle enough not to show in a photo, but it's noticeable in daylight. Extra maddeningly, if I hadn't cut up the last part of the first ball in order to get speckled pieces to use for the visible seams, I might have finished the last section with it.
Now I have to pick a plan:
- Just finish this section, sew it in and live with it (not bloody likely)
- Stuff the whole project in a bag in the corner and never lay eyes on it again until after the intended recipient graduates from college
- Finish this section and reknit the other side section from the second ball so the brighter parts will be symmetric
Tuesday, March 25, 2008
My three sins
 This is what I'm going to knitter's hell for: I have three pairs of Tofutsies socks started at the same time. And they're all just plain, ribbed, toe-up socks.
In my defense, the red sock has a sad, sad story. The sock shown is the second sock of the pair. The first sock is in a LANDFILL somewhere because the housekeeping staff at the Indianapolis airport couldn't be bothered to send it to the Lost & Found office. The staffer at the L&F assured me that "Oh, I'm sure it just got thrown away, they only send stuff to us if it's VALUABLE." Yes, I know it's my own fault for having dropped it while boarding, but really, did they have to throw it out immediately?
The red socks and the blue ball of yarn were the only knitting I had with me on that vacation. I couldn't bear to work on the red sock on the needles. So I sulked for twenty-four hours, then started the blue sock.
I am sure this is my karmic punishment for having started the red sock in the first place, when that perfectly good pink one was on the needles.
Maybe if I finish the red sock and give it to a one-legged knitter, I'll be forgiven?
Friday, March 21, 2008
A little instant gratification
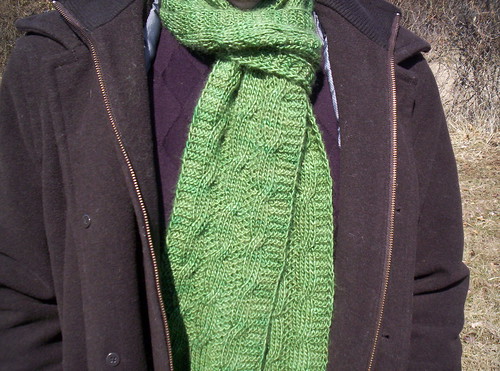 I've been working on small projects interspersed with fits of obsessive work on the GAAA. I was amused by the reversible cables from the Carol Adams square, so I knit this scarf with the same technique. The pattern is the Swelligant Scarf from Son of Stitch 'n Bitch. It was a great excuse to buy and knit with silk/wool blend yarn (Alchemy Yarns' Synchronicity). I finished the scarf just in time before I got bored with the repetition, five days after I bought the yarn.
The recipient is a dear friend who is going through a divorce. His future ex-wife had been working on a scarf for him for some time (and a very lovely scarf, also: the multi-directional diagonal scarf out of Noro Silk Garden). Once the papers were filed, he remarked that he was never going to get THAT one, and the weather was still cold, so I knit him the Swelligant.
Friday, March 14, 2008
And there might be brownies
 Here's a little advanced warning: at the March afghan squares meeting, I'm featuring the Barbara McIntire square (easy) and the Ada Fenick square (this one required careful attention, but the stitches themselves aren't too hard). I'll post photos and reviews later, but if anyone wants to get started on the McIntire square, let me warn you that I had to go down a needle size.
Meanwhile, I've been salivating over a borrowed copy of The Principles of Knitting. I saw an article about this tome in a recent issue of Vogue Knitting and knew it was the knitting book I had wanted all my life. However, since I can't really afford to spend $200 for it, I had my spouse request it as an ILL (interlibrary loan). So now at least I can study it for six weeks. Then I'll wait impatiently for the new edition that's supposed to be released in 2009.
I confess I'm inordinately proud that I know a bar increase method which isn't in the book.
Tuesday, March 11, 2008
Off with their heads

Here is the Jay Campbell square, also from February. It is knit from the outside edge to the center. I followed the instructions as written. It's not quite square even after blocking, but it will be fine sewn into the finished afghan. The center puffed up like a volcano before blocking, so I would recommend decreasing on round 41, especially for anyone using synthetic yarn.
I didn't like the particular bobble in the instructions; one could easily substitute another bobble (perhaps the one from the Vicki Sever square). And the three consecutive bobbles on round 35 didn't lie very well, and had to be poked severely into place during blocking. Moving the center bobble down to round 35 might work better.
Fidgety business: There is no compensation for cable splay anywhere in the design. See how the edges ruffle a bit? That's because there are no increases at the bottom of the cables. I don't like the way the three-strand braids fan out at their tops, either. I will probably re-knit this square later and do a major re-engineering job. It will be tricky because any new increases and decreases have to balance out; otherwise the number of rounds in the square will be affected, and I don't want to cut off the top of the the stylized figure's head!
Monday, March 10, 2008
The unholy trinity
 The Ginette Belanger square was featured at the February meeting of the River Wools blocks-of-the month group. I like the look of trinity stitch (the bumpy side panels), but I don't enjoy working it. The double increases are hard on my wrist, and if you make a mistake, there's usually no way to fix it except by ripping out.
As with the Levy square, I cast on 54 stitches instead of 48.
Fidgety business: I ended the bottom border on the RS instead of the WS, then worked a foundation row using the last row of each chart in its proper location. In other words: K3, work Row 4 of Chart A over 22 sts, work Row 24 of Chart B, work Row 4 of Chart A over 22 sts, K3.
I also stopped a few rows early; I didn't work the last set of Chart B rows 1-4. However, as with the Levy square, I worked the cable twists for Row 1 into the first row of the top border.
Sunday, March 09, 2008
Square one
 The Julie Levy square was the first Great American Afghan square featured at the January River Wools blocks-of-the-month meeting (the one I missed due to flu). I actually knit it twice, since my yarn order for the afghan hadn't come in yet. This is the second version, out of Cascade 220 Superwash. My first version came out rather oversized, so I went down a needle size for the second version.
I'm adjusting the number of stitches in the bottom and top garter borders for several of the squares. The directions for this square called for casting on 48 stitches; however, other squares (with the same suggested needle size) called for casting on as many as 60 stitches! Since my garter stitch gauge is about 18 sts/4", I cast on 54 stitches instead. That meant I only needed to increase 22 stitches in the last row of the bottom border. Likewise, I decreased 22 stitches in the first row of the top border.
Fidgety business (for the truly obsessive only): I ended the center section two rows early (on row 13 of Chart A). However, as I knit the first row of the top border (a RS row), I worked the cable crossings from the next row of the Charts, except all in knit stitches. Why? Two reasons: First, the square was getting a little bit tall, and this let me shave 2 rows off. Second, I think this matched the transition out of the bottom border better. As a bonus, since this was the decrease row, I hid some of the decreases in the cable crossings.
Tuesday, February 12, 2008
The start of something big
February's blocks will be the Ginette Belanger square and the Jay Campbell square. I've finished the knitting and I'll post photos and comments on those soon.
